Friday, January 27, 2012

Baked Dijon & Lime Chicken


Pin It
 
This is probably one of my easiest prep, throw in the oven dishes to date! And did I mention it's delicious? Enjoy!
 
Ingredients:
  • 3-4 boneless, skinless chicken breasts, cut into large chunks
  • 3 tbsp Dijon mustard
  • 1 tbsp light mayonnaise
  • 1 clove garlic, crushed
  • 1 lime, zested then juiced 
  • 3/4 tsp pepper
  • salt (optional) 
    • The original recipe added salt after rinsing the chicken. I opted for the lower sodium version and couldn't tell it was missing)
  • dried parsley (original recipe called for parsley but I was out - still turned out great!)
  • cooking spray
Directions:
  1. Preheat oven to 350°. Spray a large casserole dish with cooking spray.
  2. Cut chicken into large chunks (or you can leave them whole. Keep in mind your cooking time will need to be increased to around 45-50 minutes). Rinse the chicken & pat dry. Place chicken in large bowl.
  3. In a small bowl combine Dijon, mayonnaise, lime juice, lime zest, garlic and pepper. Mix well. Pour over chicken, tossing well to coat.
  4. Place chicken in dish as a single layer. Top the chicken with dried parsley. 
  5. Bake until cooked through, about 30-35 minutes. 
  6. Finish the chicken under the broiler until it is golden brown. 
  7. Serve chicken with the pan juices drizzled over the top.
 Courtesy of Gina's Skinny Recipes
Pin It


Like what your reading? Share it!

Monday, January 23, 2012

Crispy Southwestern Wontons


Pin It

Ingredients:
  • 1 tbsp olive oil
  • 1/4 cup diced onion (I used frozen)
  • 1/4 cup diced red bell pepper
  • 1 clove garlic, minced
  • 1/4 cup frozen corn kernels
  • 1/4 cup canned black beans, drained
  • 5 oz (1 cup) chicken, shredded
  • 1/4 tsp pepper
  • 1/2 cup shredded cheddar cheese
  • 2 tbsp (1/2 pkg) dry ranch dressing - see Buttermilk Dry Ranch Dressing Mix for an MSG-free version
  • 24-30 wonton wrappers
  • canola or vegetable oil for frying
 Directions:
  1. Heat olive oil in a large skillet over medium heat. 
  2. Add onions and saute for 5 minutes. 
  3. Add bell pepper and saute for 5 more minutes. 
  4. Add garlic and saute for 1 minute. 
  5. Add corn, beans, and chicken and stir to combine. Remove from heat.
  6. Move the chicken mixture to a bowl and season with pepper, then stir in cheese and dry ranch dressing. 
  7. Begin heating about 1/2 inch of canola or vegetable oil in a large skillet over medium heat. 
  8. Meanwhile, scoop 1 teaspoon of chicken mixture into the center of each wonton wrapper. 
  9. Rub some water on two sides of the wrapper, then fold over to firmly seal, forming a triangle, and gently press out any extra air pockets. 
  10. When the oil is hot (I placed a very small piece of chicken (about the size of a thumbnail) in the oil and waited until it started bubbling good), place 6 wontons at a time into oil. Cook about 1 minute per side until golden and crispy.
Pin It


Like what your reading? Share it!

Thursday, January 19, 2012

Buttermilk Ranch Dry Mix - MSG-Free

 Ingredients:
  • 1/4 cup dry buttermilk powder (found on the baking aisle with the dry milk)
  • 2 tablespoons dried minced onion
  • 2 tablespoons dried parsley
  • 1 tablespoon dried chives
  • 1/4 teaspoon salt, or to taste
  • 1 teaspoon garlic powder
  • 1 teaspoon dried celery flakes
  • 1/4 teaspoon white pepper
  • 1/4 teaspoon paprika
  • 1/4 teaspoon dried dill weed

Directions:

  1. Mix the buttermilk powder, dried onion, parsley, chives, salt, garlic powder, dried celery flakes, white pepper, paprika, and dill together, and store in a cool, dry place. For a finer texture, place ingredients in a blender and pulse several times.
  2. There are a couple different ways to make the dressing: YOU DECIDE:
    • Whisk together in a mixing bowl with 2 cups of mayonnaise and 2 cups of milk until smooth. 
    OR 
    • 1/4 cup nonfat plain or Greek yogurt, 1/4 cup light mayo and 1/4 cup skim milk per 2 Tbsp dry mix 
    OR
    • 1/4 cup sour cream, 1/4 cup low-fat milk, and 1/4 cup light mayo per 2 Tbsp dry mix
  3. Store in the fridge.
(Courtesy of: Dry Buttermilk Ranch Mix by Scotdog)


Like what your reading? Share it!

Wednesday, January 18, 2012

Banana Toffee Danger Pie


When I first saw this recipe on pinterest, I thought I have found the ultimate combination for a pie. This pie combines some of my all-time favorite ingredients: toffee, banana, and whipped topping (aka Cool Whip). Being from the South, this pie had never crossed my radar before. Apparently, this pie is more popular up North and overseas - the southern equivalent, I think, is Banana Cream Pie. This is no Banana Cream Pie though.

Now you may be wondering what is the "danger" part of this pie. There actually is a dangerous element to this recipe besides its yummy goodness. Turning the sweetened condensed milk into toffee can be very dangerous if left unsupervised. To make the toffee, place a can of sweetened condensed milk into a large/tall pot of boiling water and let it boil for 2 1/2 hours. If you have any clue about how water goes through it's different phases (ice vs liquid vs vapor), water, by nature, will evaporate as it boils. If the can becomes uncovered in the boiling water, it will EXPLODE. No joke. I read comments on other posts about how people would leave their house while this was cooking (and I don't know why someone to leave a boiling pot of water on the stove and not be at home - that is beyond my comprehension) and come back to a gooey mess requiring kitchen makeovers (i.e. ruined cabinets and repainting walls). So PLEASE heed my warning: DO NOT, UNDER ANY CIRCUMSTANCE, LEAVE THIS UNATTENDED. It's not worth it. I set my kitchen timer to go off every 20 minutes to remind me to go check on it just to make sure. I did have to add water on more than one occasion.

Depending on how "homemade" you want to make this pie will depend on the ingredients needed. I confess, I didn't make a homemade graham crust or the homemade whipped topping - I used the pre-made. Here are the ways to make it from scratch:

Homemade Graham Crust:
  • Refer to my Eggnog Cheesecake Bar recipe and follow steps 1-3. 
  • Use a pie pan instead (and no aluminum foil like I used in that recipe)
  • Bake about 10 minutes, until it is just slightly brown around the edges. Watch it so it won't burn!
  • Let cool before use.
Homemade Whipped Topping:
  • I have read that freezing a large mixing bowl and beaters for about 10 minutes prior to making is a good idea. 
  • Using electric mixer, whip 2 cups whipping cream (heavy cream) until peaks are about to form.
  • Add 2 tsp of vanilla and 2 tbsp confectioner's sugar and beat until stiff peaks form.
  • (Courtesy of Paula from Allrecipes)
Now onto the main show...
Ingredients:
  • 3 bananas
  • 1 tin of sweetened condensed milk
  • 2 cups whipped topping, thawed
  • 1 graham cracker crust
  • 1 small bar of chocolate (optional for garnish)

Directions:
  • Warning: Danger!

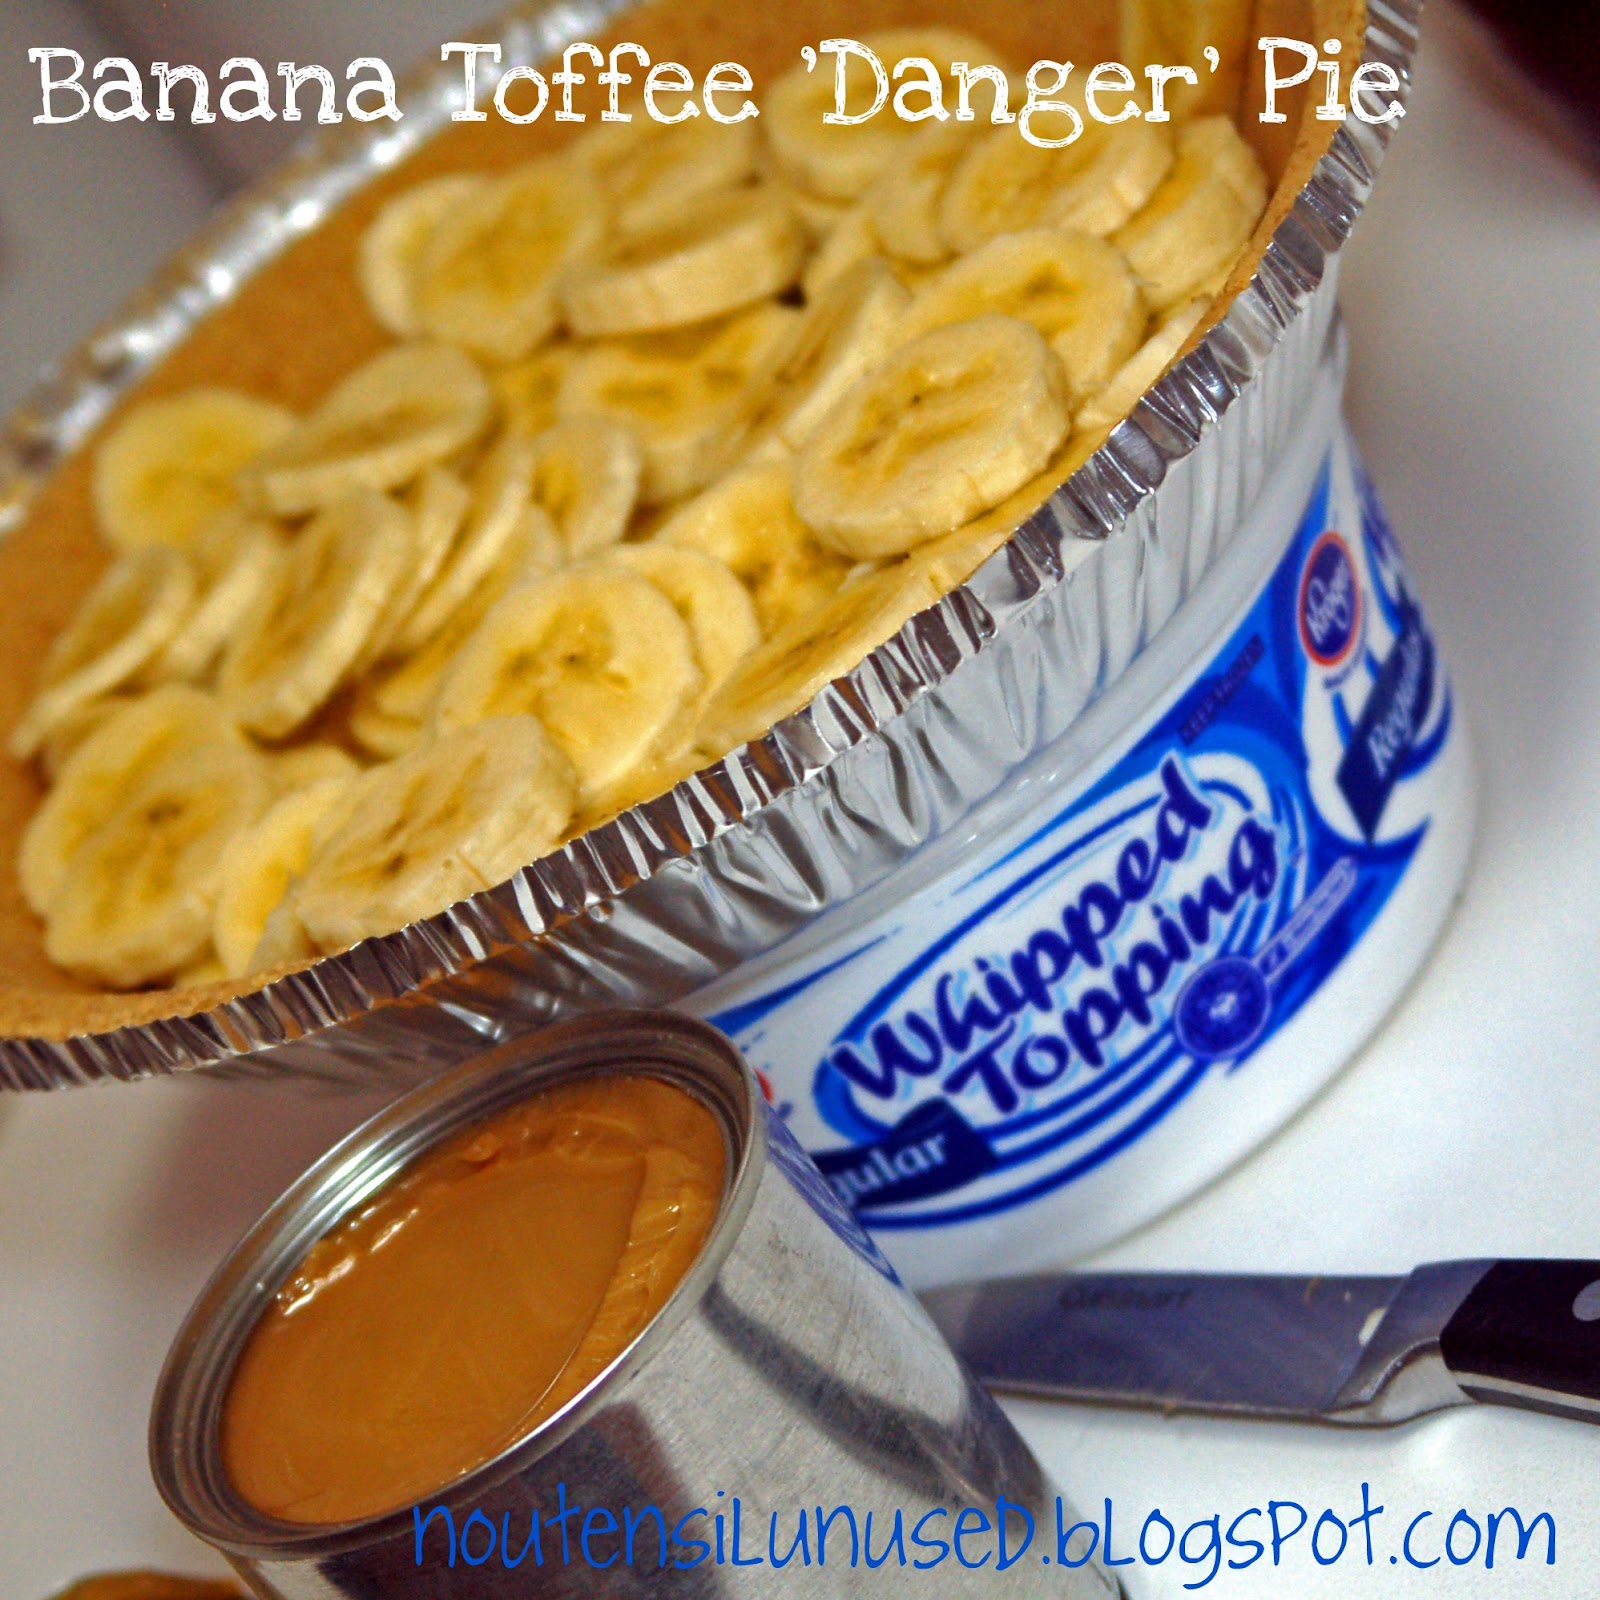
    Bring large/tall stock pot of water to boil. Remove the label from the sweetened condensed milk. Place unopened can in boiling water, completely submerged. Cover and boil for 2 1/2 hours. KEEP CAN COVERED and SUBMERGED IN WATER AT ALL TIMES!!!! (see above for details) **This step can be done hours to days to months ahead of time. I went ahead and prepped 2 cans since I was going through the trouble of watching a pot for 2 1/2 hours.

  • Your Toffee
    Take the pot off the stove and allow the can to cool. This will take some time. Don't expect it to cool in 30 minutes - you can place it in the refrigerator or freezer if you need it in the more immediate future. 


  • Once the can has cooled you can start the rest of the pie prep. 
  • Make the crust and whipped topping if you are making from scratch.
  • Bananas Sliced
    Slice bananas and place into pie crust. 


  • Open toffee can and stir with a knife until smooth.
  • Toffee Spread
    Pour toffee onto bananas and smooth.


  • Final Product
    Spread whipped topping over pie.


  • Grate chocolate over top for garnish (optional).
  • Cool in refrigerator for at least one hour to set.
(Courtesy of Brooklyn Limestone's Banoffee "Danger" Pie)


Like what your reading? Share it!

Friday, January 13, 2012

Poppy Seed Chicken


Ingredients:
Cream of Something Soup Pin It
  • 5 cups chicken breasts, cooked and cubed (I used 3 large chicken breasts)
  • 1 cup sour cream
  • 2 can equivalent of Cream of Something Soup
    • The Original recipe calls for 2 cans of condensed cream of chicken soup
    • I substituted the cream of something soup and the recipe turned out wonderfully.
  • 1 tsp Worcestershire sauce
  • 1 tsp celery salt
  • 1 tsp minced garlic
  • 1 Tbsp lemon juice
  • 1/4 tsp pepper
  • 2 cups crushed Ritz crackers (about 1 1/2 rolls of crackers)
  • 1/2 cup melted butter
  • 1 Tbsp poppy seeds
Directions:
  1. Preheat oven to 350 degrees. Spray cooking spray into 9x13" casserole dish.
  2. Cut the raw chicken into cubes and place into casserole dish. Spread just a little olive oil over the top (to keep the chicken from drying out) along with a sprinkling of salt and pepper.
  3. Bake for 20 minutes. Turn chicken over. Bake for another 15-20 minutes until done. It does not have to be browned - just cooked through at this point. Drain juice off of chicken in large colander and place back in casserole dish.  
  4. While the chicken is baking, this gives time to reconstitute the cream of something soup. Click on the link for the recipe.
  5. Stir/whisk together the condensed soup, sour cream, Worcestershire sauce, celery salt, garlic, lemon juice and pepper.
  6. Pour over the cooked chicken.
  7. In a separate bowl, stir together the crushed crackers, poppy seeds and melted butter. Sprinkle over the chicken and sauce.
  8. Bake for 30 minutes in the preheated oven, until the top of the casserole is browned and the sauce is bubbly. Serve plain or over rice. 
(Courtesy of The Girl Who Ate Everything )


Like what your reading? Share it!

Wednesday, January 11, 2012

Cream of "Something" Soup - MSG-Free


10 reasons why this is one of the best substitutions ever:
  1. ore ECONOMICAL - lower cost per serving than store bought
  2. LESS WASTE - only need 1/2 a can of condensed soup for a recipe? Reconstitute what you need!
  3. YOU are controlling what goes into your soup - fewer preservatives/stuff you don't know what it is on the label.
  4. It's GLUTEN-FREE.
  5. It can be MSG-FREE depending on what bouillon you choose.
  6. It can be LOW SODIUM if you replace the bouillon AND water with low-sodium chicken/beef/vegetable broth - your choice. 
  7. It's LOW-FAT.
  8. FLAVOR how you like it: 
    1. Cream of Chicken equivalent: use Chicken Bouillon
    2. Cream of Celery equivalent: 1 stalk finely chopped (or throw it in the food processor) sauteed celery or 1/8 tsp celery salt per 2 cups dry milk
    3. Cream of Mushroom: Add ~1/4 cup finely chopped (or food processed) sauteed mushrooms 
    4. Cream of Potato: Add 1/2 cups mashed potato flakes per 2 cups dry milk
  9. If you are a CANNER: I've read on other websites where people prep this ahead of time, then can it to save on prep per meal time.
  10. If you like to FREEZE ahead of time: To save space, use 1/2 the amount of liquid, cook until thickens to the consistency of a typical condensed soup, then freeze. (I would freeze, then vacuum-pack and return to freezer for longer term/fresher storage.) Add the remaining liquid when you are ready to use. 
Ingredients:

To Make 1 Can Equivalent of Condensed Soup:
    • 2/3 cup non-fat dried milk
    • 1/4 cup cornstarch
    • 4 tsp bouillon - you choose the flavor
    • 4 tsp freeze dried minced onions
    • 1/4 + 1/8 tsp dried basil (to equal 1/3 tsp)
    • 1/4 + 1/8 tsp dried thyme or parsley (to equal 1/3 tsp)
    • 1/4 + 1/8 tsp pepper (to equal 1/3 tsp)
      • Mix with 1 1/4 cup hot water (almost boiling) when ready to reconstitute 
 To Make the Original Recipe - makes 3 Cans of Condensed Soup:
    • 2 cup non-fat dried milk
    • 3/4 cup cornstarch
    • 1/4 cup bouillon
    • 4 Tablespoons freeze dried minced onions
    • 1 teaspoon dried basil
    • 1 teaspoon dried thyme
    • 1 teaspoon pepper
      •  Mix with 3 3/4 cups hot water (almost boiling) when ready to reconstitute

Directions to Mix:
  1. Combine Dry Ingredients into an airtight container. Either store in the fridge or freezer until ready to use.
Directions for Use:
  1. Mix in a small sauce pan dry mix with appropriate amount of water, depending on which serving size you choose above.
  2. Cook on low/medium heat until sauce thickens. When you first reconstitute the mixture, the herbs float to the top of the liquid. As the soup thickens, the herbs will start to distribute more evenly in the soup.  Keep in mind to constantly stir, especially if you have the heat closer to medium. The cornstarch will thicken faster and will form "globs" in the bottom if you aren't careful. 
  3. Use in whatever recipe calls for condensed soup!
  4. Enjoy! 
Nutritional Info
Inspired from One Orange Giraffe


Like what your reading? Share it!

Tuesday, January 10, 2012

Basil Dipping Sauce


Ingredients:
  • 1/2 cup Sour Cream
  • 3 tablespoons mayonnaise (like Hellmann’s)
  • 3 tablespoons fresh basil, chopped
  • 1 scallion, chopped
  • 1/2 clove garlic
  • 1/2 teaspoon Worcestershire sauce
  • Kosher salt and ground black pepper
Directions:
  1. Use a blender or food processor to combine all ingredients except salt and pepper until smooth.
  2. Taste and season with salt and pepper as desired.
Courtesy of Cinnamon Girl Recipes


Like what your reading? Share it!

Monday, January 9, 2012

Oven-'Fried' Parmesan Zucchini Chips


This is a great side alternative to fries or onion rings. Goes great with burgers and about anything else. This is a great way to incorporate a veggie into any meal or serve as a snack! 

Ingredients:
  • 1 cup seasoned breadcrumbs (I used roasted garlic flavor)
  • 1/2 cup Parmesan cheese, fresh grated
  • 1/2 teaspoon salt
  • 1/2 teaspoon onion powder
  • 1/8 teaspoon freshly ground black pepper
  • 1/3 cup milk
  • 2 small zucchini cut in 1/4-inch-thick slices
  • Cooking spray or vegetable/olive oil

Directions:
  1. Preheat oven to 425° F. Grease a large oven-proof wire rack set on a baking sheet.
  2. Whisk together bread crumbs, Parmesan, salt, onion powder and pepper in a medium bowl. 
  3. Place milk in a separate shallow bowl. 
  4. Dip zucchini slices in milk then in breadcrumb mixture patting the crumbs on. 
  5. Place slices on wire rack. 
  6. Repeat until all are coated.
  7. Bake for 30 minutes or until golden brown. 
  8. Serve immediately with basil dipping sauce if desired.
(Courtesy of Cinnamon Girl Recipes)
Dip these in a wonderful Basil Dipping Sauce - see my post here


Like what your reading? Share it!

Thursday, January 5, 2012

Inside-Out Burgers


Good ole' hamburgers were on the menu last night and I decided to put a delicious twist my aunt introduced me to a few years ago - put the cheese on the inside. If you haven't experienced this before, I so recommend you try this the next time you throw hamburgers on the grill (or pan fry if that's your cup of tea). If it sounds hard to you - trust me it's not.

  1. Season your meat however you like to fix it. I prefer mine mixed with a little minced garlic (about a 1/4 tsp per 1/2 lb of meat) and sweet & spicy steak sauce (about 1 tsp per 1/2 lb of meat).
  2. If you are using a package of ground meat (versus the preformed patties), pull out however much you would consider a patty (normally 1/4-1/2 lb meat). 
  3. Take this and divide it in half. Take the 1st half and form a patty to the diameter you desire for the whole burger (it will be 1/2 the thickness of your finished product). 
  4. Place the cheese and any other goodies you want (bacon, onion, etc.) in the middle of your patty - leave about 1/2 inch border. 
  5. Take the 2nd half of your meat and form a 2nd patty to match. 
  6. Place the 2nd half on top of the 1st half. 
  7. Press the patties together and work the corners together by hand to form a good seal. 
  8. I finish seasoning my meat with either a dusting of seasoned salt and pepper or Mrs Dash and pepper before throwing them on the grill. 
  9. Cook until done - try to keep the flipping to a minimum to decrease the chance of your burger falling apart. 


Like what your reading? Share it!