In addition to cooking, I have always had a passion for crafting and photography. The photography part I indulge in on a regular basis. Crafting inspiration (and now Pinterestspiration :) - I'm sure most of you can relate) I have gone through in spurts in the past, largely due to time constraints from work and school.
The main reason I developed this blog was to have an online paperless resource for recipes I want to keep in my own "recipe book". Now that I have 60 published posts, I'm starting to miss have a good ole recipe book in the kitchen. I don't like printing recipes that I am fixing for the 3rd+ time; that's a waste of paper. Dragging a laptop or dealing with my phone is doable but can be frustrating as how my hands will be in raw meat and the phone turns off - grrr!!! Wash hands, turn back on/hit page down, get hands dirty again, repeat in a few minutes.
So that got me thinking: I want a recipe book that I can add to easily and something that won't get disgusting if food gets dripped on it. Ideas start running through my head... My perfect recipe book needs to be bind-able and printable. That eliminates the old fashioned recipe box - I've always disliked those for some reason. 3 ring binders come to mind. Great idea - I can add to that, page protectors will keep the pages clean. Now to make it cute. Looking around Pinterest, I found fabric covered binders. Hmm... interesting. Why don't I check out Etsy and see what's out there for these fabric covered binders?? Cruise on over to Etsy... start checking it out... there are some great looking fabric binders that these sellers offer! Adorable!! BUT what happens if my beloved fabric covered binder is on the counter and something spills or I don't see that little puddle of water on the counter? Gross!! There's really no good way to disinfect/clean the fabric if it gets either stained or splattered with raw meat or something else that could grow bacteria. Ewww! Those thoughts turn my stomach. Ok, so what about vinyl? I can put disinfectant on that without a problem and it should wipe clean since it's waterproof. Great! Search on Etsy again...nothing really comes up. Have I come across the undiscovered country of Waterproof binders?? Surely, I'm not the only one who thinks this way about recipe books. Hmmm, the crafter in me starts thinking again. This could be dangerous. I could make this myself.
So off to Joann's I go, to see what has surfaced in the fabric world since I have last bought fabric (Which has probably been about 5-10 years since my sewing machine has surfaced. College kept me busy most of the 2000's). Wow! I forgot how much I love that store! It was even better than I remember and the crafter in me started coming out even more. I collected a couple of sample materials to work with and returned home. In my pinterest adventures, I saw posts on how wonderful this Mod Podge stuff is for gluing/decoupage-ing/waterproofing. I had never used it in the past, but it claims to be the best thing since the invention of the wheel and Swiss cheese so I thought I would give it a whirl on some fabric. I wish I had saved the swatch of fabric I Mod Podged and submitted it to one of those Pinterest Fail sights. It was not pretty. Yeah, it may have sealed the fabric to some degree, but it was the roughest, stiffest fabric I have ever felt. It could have doubled as sandpaper. I was disappointed that the wonderful patterns of cotton fabric had not become an option for this project.Very sad.
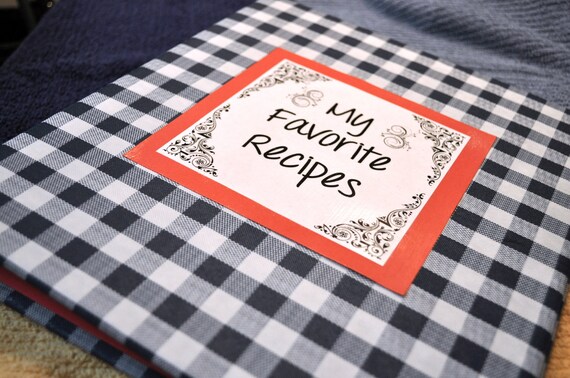
Onto the next experiment. I had also bought a remnant of vinyl tablecloth type material. This may work better. I grabbed some spray adhesive and went to work on adhering it to my binder. This is going great. It's smooth, waterproof, cute and cooperating! I then cut and adhered coordinating scrapbook paper to the inner cover. This looks wonderful! Now onto cover design. I got to learn more about Adobe Photoshop Elements in designing the graphic art for the front cover. Oh, the custom options are limitless! I adhered my design to the same color scrapbook paper as for a border. Hmm, how to make this waterproof. I didn't really want to get into the laminating business, that would require an even bigger investment and another trip into town. Let's try the Mod Podge again. It worked so much better on paper than fabric! Two coats dried later, I sealed it with some clear acrylic for good measure. I then adhered it to my binder. Voilà! I was quite impressed with myself. That wasn't too bad either. Back to my original thought, the undiscovered country of waterproof binders. I could sell these. And so, PharmCreations was born!
Like what your reading? Share it!


