Saturday, October 22, 2022

Cinnamon Bun Cake

Ingredients:

Cake:
  • 4 eggs
  • 1 box yellow cake mix
  • 8 oz sour cream
  • 5 oz vanilla pudding mix
  • 2/3 cup water
  • 3/4 cup vegetable (or canola) oil
  • 2 oz orange juice (optional)
Cinnamon Swirl:
  • 1 cup brown sugar 
  • 3 tsp cinnamon
Glaze:
  • 2 cups powdered sugar 
  • 4 tbsp milk
  • 1 tsp vanilla
  • 1 tsp orange zest (optional)
Directions:
  1. Preheat oven to 350F. 
  2. With a hand mixer, mix all cake ingredients together. 
  3. Spray 9x13" cake pan or cast iron skillet. 
  4. Pour 1/2 cake mixture into pan
  5. In a separate bowl, mix the cinnamon swirl ingredients together.
  6. Pour the cinnamon swirl over the batter in pan.
  7. Pour the remaining cake batter over cinnamon swirl and run a knife through the cake and swirl mixture.
  8. Bake about 50-55 minutes at 350 or until knife comes out clean
  9. A few minutes before cake is done, mix together the glaze ingredients until a smooth consistency. Pour glaze over cake as soon as it is removed from the oven. 
  10. Sprinkle orange zest over the icing (optional). 
  11. Serve cake either hot or cold. 


Like what your reading? Share it!

Thursday, December 3, 2015

Dry Veggie Broth Mix

Ingredients

3 Tbsp onion powder
1 Tbsp garlic powder
1 tsp sea salt
1 tsp black pepper
1 tsp thyme
1 tsp paprika
1/2 tsp tumeric
1/2 tsp parsley flakes
1 cup nutritional yeast

Directions

Mix all ingredients together, adjusting for your taste preferences. (If you hate once of these spices simply omit it.)
Store in an air tight container.


Like what your reading? Share it!

Saturday, March 29, 2014

Low Sodium Slow Cooker Steak and Black Bean Chili

I'm sorry for not having a picture of this delicious low sodium version of steak and black bean chili. It was consumed before I had a chance to take a pic. I will update this post with a picture when I make this again.

Ingredients: 
  • 2 lb beef top round steak (I used a New York Strip Steak) 
  • 1 tbsp dried minced onion
  • 1 cup low sodium beef broth
  • 1/2 tsp onion powder
  • 1/8 tsp ground black pepper
  • 1/8 tsp paprika
  • 3 teaspoons chili powder
  • 1 teaspoon ground cumin
  • 1 lb dried black beans, reconstituted (prepared to package directions) 
  • 1 can (28 oz) no salt added diced tomatoes, undrained
  • 2 cans (8 oz) no salt added tomato sauce
  • 1 can (4.5 oz) chopped green chiles, undrained
  • 16 oz frozen corn
  • 1 sweet onion, diced
Directions:
  1. Prepare dried black beans to package directions.
  2. Cut steak into 1 inch cubes, trimming off excess fat.
  3. Mix all ingredients in crock pot.
  4. Cook on low for 8 to 10 hrs.
  5. Top with cheese and/our cream as desired.
Inspired from: http://www.bettycrocker.com/recipes/slow-cooker-steak-and-black-bean-chili/


Like what your reading? Share it!

Monday, July 8, 2013

Spicy-Sweet Grilled Salmon

So this was another recipe I tried that to me did not fit it's original description. Awesome - yes; spicy/sweet -  not so much. It was full of flavor and I might even go to say, the best salmon I've ever had. It wasn't dried out and a great balance of tang and sweet from vinegar/soy sauce/lemon juice/cilantro to brown sugar. Maybe if I added more red pepper flakes it would have qualified for spicy, but definitely not fixing the recipe as is. This recipe was originally made for broiling, but with the weather so nice outside, it was impossible for me to deny the grill this pleasure. Grilled salmon to me always has such a wonderful flavor. It has been a very long while since I have grilled salmon, so I was excited to break out my grilling skillet - it really is worth the purchase. The original title described this as "glazed". I'm sure since the heat source is on the bottom of the fish for grilling vs the top for broiling, that would contribute to it not really turning out "glazed". My feelings were not hurt that it didn't turn out that way because it was so delicious anyways!
 
Ingredients:
  • 1 1/2 pounds fresh salmon fillet with skin removed 
  • 1/4 cup red wine vinegar 
  • 1/4 cup olive oil 
  • 1/4 cup reduced sodium soy sauce 
  • 1/4 cup water 
  • 1 tablespoon lemon juice 
  • 1/2 teaspoon red pepper flakes, or to taste 
  • 1 teaspoon onion powder 
  • 1 teaspoon garlic powder 
  • 2 teaspoons chopped fresh cilantro 
  • 1/3 cup brown sugar, packed 
  • salt and ground black pepper to taste
Directions:

  1. Place salmon in a gallon sized Ziploc bag. 
  2. Combine the vinegar, olive oil, soy sauce, water, lemon juice, red pepper flakes, onion powder, garlic powder, cilantro, and brown sugar in a blender (I used my stick blender). 
  3. Blend until brown sugar dissolves. 
  4. Pour the marinade over the salmon to cover evenly. 
  5. Seal the bag and refrigerate at least 2 hours (laying the salmon flat).
  6. To grill: If you have one of those grilling skillets, this makes grilling fish a lot easier. Lightly grease skillet (and grill) with cooking spray or canola oil (it makes removing the fish and cleaning the grill a lot easier if it doesn't stick). 
  7. Place fish in skillet. Keep the marinade to baste with in a few minutes.
  8. Salt and pepper to taste. 
  9. Grill for 15-25 minutes (depending on the thickness of the fish). No flipping required! Baste every 3-5 minutes with marinade to keep fish moist.Grill until salmon is done - when fish is no longer bright red and can be flaked with a fork. 
Broiling Directions:
  • Broiling is also an option. Here are the directions from the original recipe for broiling and making the sauce from the remaining marinade. I decided to forgo the sauce. The fish was plenty moist and flavorful by itself.  
  1. Line a broiling pan with foil. 
  2. Remove salmon from marinade, and place on prepared broiling pan; season to taste with salt and pepper. 
  3. Transfer remaining marinade to a saucepan. 
  4. Turn on broiler to low. 
  5. Broil salmon about 6 inches from the heat for 5 minutes; brush with remaining marinade. Broil an additional 5 to 10 minutes, brushing 2 or 3 more times with additional marinade. 
  6. Meanwhile, cook the remaining marinade over low heat until it thickens and reduces by one-third, 5 to 10 minutes. Use cooked marinade as a dipping sauce or drizzle over salmon just before serving.


Like what your reading? Share it!

Saturday, April 20, 2013

Banana Foster Monkey Bread

Ingredients:
  • 1/2 cup white sugar
  • 1 tbsp ground cinnamon
  • 1 16.9 oz package buttermilk biscuit dough (I used Pillsbury Grands), cut into quarters
  • 3 ripe bananas, coarsely chopped
  • 1/4 cup pecans, chopped
  • 1/2 cup butter
  • 1/2 cup light brown sugar, packed
  • 1 tsp vanilla
Directions:
  1. Preheat oven to 400 degrees F. Grease either a loaf pan or a bunt pan.
  2. Place sugar and cinnamon in large plastic bag. 
  3. Cut biscuit dough into quarters using a pizza slicer.
  4. Add dough, bananas, and pecans to bag. Shake well to coat.
  5. Pour mixture into pan.
  6. Melt butter in measuring cup in microwave (I did mine in 30 second intervals to prevent splattering).
  7. Stir in brown sugar until completely dissolved.
  8. Add the vanilla and stir well.
  9. Pour mixture over biscuit dough.
  10. Bake in oven for 30 to 40 minutes until golden brown. Allow to cool 10 minutes before serving.

Recipe courtesy of : Allrecipes.com


Like what your reading? Share it!

Thursday, January 31, 2013

The Best Chocolate Cake Ever with Pudding Frosting


Sorry the picture isn't up to my usual standards but I decided to take this in a hurry and after the cake was half gone. This was the moistest, most wonderful chocolate cake I have ever tasted! I was a little skeptical when I put it in the oven because the batter was so runny but it turned out great! I had also never tried pudding frosting before and I am sold on it now. I was curious about the coffee and buttermilk addition, but no worries, you can't taste either at all. They just enrich the chocolate flavor. Enjoy!

Ingredients:

Chocolate Cake
  • 1 3/4 cups unbleached all-purpose flour 
  • 2 cups sugar 
  • 3/4 cup baking cocoa 
  • 2 tsp baking soda 
  • 1 tsp baking powder 
  • 1 tsp salt 
  • 2 large eggs 
  • 1/2 cup vegetable oil 
  • 1 cup black strong coffee (1 Tbsp coffee with 8 oz boiling water brewed then cooled to room temp) 
  • 1 cup buttermilk OR 1 cup equivalent of buttermilk powder & water 
  • 1 tsp vanilla extract 
Pudding Frosting
  • 1 cup milk 
  • 1 3.4 oz box instant vanilla pudding 
  • 8 oz cream cheese (room temperature, leave out for at least an hour or two) 
  • 12 oz Cool Whip (thawed, leave out for at least 10-15 minutes)
Directions:

Cake Directions:
  1. Coffee Prep: Brew your coffee and let it cool. You want it to room temp by the time you need to mix it in the cake. 
  2. Pan Prep: Grease and flour either a 13x9 inch cake pan or 2 9" round cake pans. Cut either wax paper or parchment paper to size and line bottom of pan(s). 
  3. Oven Prep: Preheat oven to 350 degrees.
  4. Mix all dry ingredients into one mixing bowl. Sift flour and cocoa together.Whisk together to ensure an even mixture.
  5. Mix all wet ingredients into another mixing bowl. Mix well.
  6. Pour wet ingredients into dry ingredients and mix. Use an electric mixer until well blended but do not over mix.
  7. Pour evenly into pan(s).
  8. Bake at 350 for 28-30 minutes. When a toothpick inserted into the center of the cake comes out clean, your cake is done.
  9. Allow cakes to cool in pans for at least 15-20 minutes before removing onto cooling racks. Allow cakes to cool completely before attempting to frost.
  10. Frost cake using rubber spatula and enjoy!
Frosting Directions:
  1. While cake is baking, mix milk and pudding in a small bowl using an electric mixer for 1-2 minutes, then allow pudding to set. 
  2. Using an electric mixer, whip cream cheese until fluffy. 
  3. Add Cool Whip to cream cheese and continue to mix until well blended.
  4. Add pudding to cream cheese mixture and continue to mix until well blended.
  5. Place frosting in refrigerator until needed. 
Store cake in refrigerator after frosting. 

Recipe Courtesy of The Little Kitchen


Like what your reading? Share it!

Wednesday, January 2, 2013

Homemade Glass Cleaner


Happy New Year everyone! I decided to try another homemade cleaning product - glass cleaner this time - to see if it is all it is cracked up to be. My skeptical self was pleasantly surprised at how well this works - just like the brand! It cut through dried food spilled on the stove top like pre-made glass cleaner does. It also cleaned the bathroom mirror without streaking! I thought I would share this wonderful find. As always, be careful mixing chemicals. Be in a well ventilated areas and don't go breathing in the noxious fumes!

I would caution to only use this on "approved glass cleaner" surfaces such as glass, chrome, stainless steel, plastic, enamel, ceramic tile, and/or porcelain. Do NOT use on wood or other varnished surfaces. Always spot test if there is a question (and use your common sense lol). Enjoy!

Ingredients:
  • 1/8 cup ammonia
  • 1/2 cup rubbing alcohol (70% isopropyl alcohol)
  • 1/4 tsp dish soap of choice
  • ~1 qt water
  • 1 qt spray bottle
Directions:
  1. Pour ammonia, rubbing alcohol and dish soap into spray bottle.
  2. Add enough water to fill bottle.
  3. Place sprayer securely on bottle and mix gently.
  4. Clean away!
Courtesy of Budget Savy Diva


Like what your reading? Share it!

Sunday, December 30, 2012

Avocado Ranch Dip


This dip I discovered by accident when I wanted to eat my standard snack: cut up avocado and tortilla chips. I decided to add some sour cream and remembered I still had some Buttermilk Ranch Dry Mix made up from the Ranch Crack Potatoes. Threw it all in a bowl and decided to try out my new Cuisinart SmartStick Immersion Blender, Metallic Charcoal (Google Affiliate Ad) from Christmas. Vroom, Vroom, Vroom of the blender and done! It was great on the chips and I also spread on a bacon sandwich! Yummy!

Yields about 1 cup

Ingredients:

  • 1 ripe avocado, peeled and cut into chunks
  • 3 heaping tablespoons (generous dollops) sour cream (or substitute plain Greek yogurt)
  • 1 tsp Buttermilk Ranch Dry Mix - MSG-Free
Directions:

Either:
  1. Place all ingredients in small blender/food processor (I used my handy Cuisinart Smartstick Immersion Blender). Pulse until smooth. OR
  2. Smash avocado into a creamy paste then blend with sour cream and ranch mix. Enjoy!


Like what your reading? Share it!

Friday, December 28, 2012

Ranch Crack Potatoes


These potatoes are unbelievably great! This was the other new side dish I fixed to Christmas dinner and it got 2 thumbs up with permission to repeat anytime! Super easy to put together, and if you use the  Buttermilk Ranch Mix recipe, you can make it MSG-Free!

Ingredients:
  • 32oz sour cream
  • 2 cups cheddar cheese, shredded
  • 1/2 lb bacon, cooked and crumbled (or use 6oz bacon bits)
  • 1 pkg (2 tbsp) dry ranch mix - I used Buttermilk Ranch Mix to be MSG-Free!
  • 1 large bag (28-30 oz) frozen shredded hash browns
Directions:
  1. Cook bacon in microwave or frying pan until done. Pat dry with paper towels and crumble once cooled.
  2. Preheat oven to 400F degrees.
  3. Mix first 4 ingredients together in a 9x13 casserole dish. Combine hash browns into mixture and spread evenly in dish.
  4. Bake for 45-60 minutes until lightly browned on the top.
Courtesy of Crack Potatoes


Like what your reading? Share it!

Thursday, December 27, 2012

Oven Roasted Garlic Green Beans


These beans are awesome! I have permission to fix these at any time for the family. They said that they even prefer these to the Green Bean Bundles (I never thought I would see the day - lol). These are even easier to prep since you don't have to deal with the bacon wrapping. Don't get me wrong, I love my little green bean bundles, but if you are short on time, these are definitely the way to go. Enjoy!

Ingredients:
  • 1 1/2 lb fresh green beans, washed and trimmed
  • 4-5 tsp olive oil
  • 1 tsp kosher salt
  • 1/2 tsp ground pepper
  • 1-2 tsp lemon juice
  • 1 tbsp (6 cloves) minced garlic
Directions:
  1. Wash and trim beans. Place in large (8 cup) seal-able container.
  2. Mix the rest of the ingredients together (I used a small glass) and pour over beans. Seal container and shake to coat the beans evenly.
  3. Place in the refrigerator for at least 20 minutes (I left them in there for a couple of hours to marinate)
  4. When ready to cook, preheat oven to 425 degrees. Line large baking sheet with aluminum foil.
  5. Spread beans out on baking sheet in a single layer.
  6. Bake for 8-12 minutes until crisp tender (depending on how well done you like your beans). 
Courtesy of Persnickety Plates


Like what your reading? Share it!

Tuesday, December 25, 2012

Butterfinger Brownie Cookies


This recipe follows the Chocolate Mint Brownie Cookie Recipe but substitutes crushed Butterfingers in place of the Andes Mints. It was so good I thought I would share it as a separate recipe.

Ingredients:
  • 1/2 stick unsalted butter, cut into pieces
  • 1 cup semi-sweet chocolate chips
  • 1 cup sugar
  • 1/4 tsp salt
  • 1/2 tsp vanilla extract
  • 2 eggs
  • 1/3 cup + 1 tbsp all purpose flour
  • 1/8 tsp baking soda
  • 2 cups chopped Butterfingers candy bars (7.8 oz - 2 of the 6 packs you find on the candy aisle worked perfectly) (food processor or bag and hammer method work to obtain the chopped pieces)
Directions:
  1. Preheat oven to 350F degrees. Line cookie sheets with parchment paper/baking sheets
  2. Place butter and chocolate chips in glass microwave safe bowl/measuring cup.
  3. Microwave for 1 minute 30 seconds, stir, then microwave an additional 15 to 20 seconds if needed until the mixture is melted and smooth. (or if you want to go old school, you can use the double boiler method to melt the chocolate and butter)
  4. Stir in sugar, salt and vanilla into the chocolate mixture.
  5. Add 1 egg, stir in completely, then add the 2nd egg and stir in completely.
  6. In a small bowl, whisk together the flour and baking soda. Blend flour mixture in the chocolate mixture.
  7. Stir vigorously (or use the hand mixer on low) for 2-3 minutes until thick, glossy, and smooth. 
  8. Once batter has cooled, stir in the Butterfingers.
  9. Drop heaping tablespoonfuls of batter onto cookie sheets, leaving 2 inches between cookies. 
  10. Bake for 10-12 minutes, until they look crackled but still soft and gooey. 
  11. Transfer onto cooling rack after they have sat on cookie sheet for a few minutes to finish cooling.


Like what your reading? Share it!

Monday, December 24, 2012

Chocolate Mint Brownie Cookies


Yields ~ 2 1/2 dozen cookies

Ingredients:
  • 1/2 stick unsalted butter, cut into pieces
  • 1 cup semi-sweet chocolate chips
  • 1 cup sugar
  • 1/4 tsp salt
  • 1/2 tsp vanilla extract
  • 2 eggs
  • 5 tbsp all purpose flour
  • 1/8 tsp baking soda
  • 1 pkg Andes Creme de Menthe Baking Chips
Directions:
  1. Preheat oven to 350F degrees. Line cookie sheets with parchment paper/baking sheets
  2. Place butter and chocolate chips in glass microwave safe bowl/measuring cup.
  3. Microwave for 1 minute 30 seconds, stir, then microwave an additional 15 to 20 seconds if needed until the mixture is melted and smooth. (or if you want to go old school, you can use the double boiler method to melt the chocolate and butter)
  4. Stir in sugar, salt and vanilla into the chocolate mixture.
  5. Add 1 egg, stir in completely, then add the 2nd egg and stir in completely.
  6. In a small bowl, whisk together the flour and baking soda. Blend flour mixture in the chocolate mixture.
  7. Stir vigorously (or use the hand mixer on low) for 2-3 minutes until thick, glossy, and smooth. 
  8. Once batter has cooled, stir in the Andes Mints.
  9. Drop heaping tablespoonfuls of batter onto cookie sheets, leaving 2 inches between cookies. 
  10. Bake for 10-12 minutes, until they look crackled but still soft and gooey. 
  11. Transfer onto cooling rack after they have sat on cookie sheet for a few minutes to finish cooling.


Like what your reading? Share it!

Sunday, December 16, 2012

Montreal Steak Seasoning - MSG-Free


Ingredients:
  • 2 tablespoons paprika
  • 2 tablespoons crushed black pepper
  • 2 tablespoons kosher salt
  • 1 tablespoon granulated garlic
  • 1 tablespoon granulated onion
  • 1 tablespoon crushed coriander
  • 1 tablespoon dill
  • 1 tablespoon crushed red pepper flakes
Directions:

  1. Mix all ingredients together and store in an airtight container.
Courtesy of Chow.com


Like what your reading? Share it!

Cream Cheese Sausage Balls


Ingredients:

  • 1 lb hot breakfast sausage, uncooked - good luck finding a MSG-Free version :(
  • 8 oz cream cheese, softened
  • 1 1/4 cups Bisquick
  • 4 oz sharp cheddar cheese, shredded (feel free to be a little on the generous side)
Directions:
  1. Preheat oven to 350F degrees.
  2. Mix all ingredients until well combined.- easier to use hand or stand mixer with dough hook attachment.
  3. Roll into 1-inch balls and place onto lined (I used Reynolds non-stick aluminum foil - they slid right off!) baking sheet. 
  4. Bake for 25-30 minutes, or until brown.
  5. Prepping for a party? These may be frozen if left uncooked. Just add a few minutes to the baking time.
Recipe courtesy of Plain Chicken


Like what your reading? Share it!

Saturday, December 15, 2012

Homemade Hot Chocolate Mix


Makes ~28 servings

Ingredients:
  • 7 cups instant non-fat dry milk
  • 1 lb confectioners sugar, sifted
  • 2 cups cocoa powder, sifted twice
  • 2 cups dry non-dairy creamer (french vanilla or your personal favorite will work!)
  • 2 cups mini marshmallows
  • 1 cup (or use the whole bag!) mini chocolate chips
  • 1 cup (or use the whole bag!) mini white chocolate chips
Directions:
  1. Sift cocoa powder into a large seal-able storage container.
  2. Add the rest of the dry powder ingredients and chocolate chips.
  3. Place lid securely on the container and SHAKE, SHAKE, SHAKE!, SHAKE, SHAKE, SHAKE! (Make sure you do a little dance while shaking)
  4. Store in air tight container if you are keeping it for yourself or this makes a perfect inexpensive Christmas gift to be given in those cute little mason jars! 
  5. If using as Christmas gift Mason jar: Place mix in the bottom of the jar (I would recommend measuring out in 1/3 cup intervals since this is a serving) - leave enough room for the marshmallows. Place marshmallows on top of the mix, then place the lid on the jar. Make sure you make it cute with  ribbon/fabric/tag etc!
Expiration: 1 year if kept in an air tight container

Directions for Reconstitution:
  1. Place 1/3 cup mix into 8-10 ounces of hot milk. Stir until dissolved. Add marshmallows or whipped cream to the top. Then enjoy!
Recipe courtesy of my wonderful aunt! (not sure where she got it from)


Like what your reading? Share it!

Monday, November 26, 2012

Fresh Tzatzaki Sauce


Ingredients:

  • 3 cups Greek yogurt
  • 1 garlic clove, minced
  • juice of 1 lemon (3 tbsp)
  • 2 medium cucumbers, seeded and diced
  • 1 tbsp kosher salt (for salting cucumbers)
  • 1 tbsp fresh dill, finely chopped
  • Kosher salt and black pepper to taste
Directions:
  1. Peel cucumbers and slice lengthwise. Take a spoon and scoop seeds out of the middle (it should look like a little boat when you're through).
  2. Cut cucumbers into 1/4" slices and place in colander.
  3. Sprinkle 1 tbsp kosher salt over cucumbers and let stand for at least 30 minutes (to draw out the water).
  4. Drain and wipe cucumbers with a paper towel.
  5. In a food processor, place cucumbers, garlic, lemon juice, dill, and black pepper. Process until well blended.
  6. Blend mixture into Greek yogurt. 
  7. Place into refrigerator for at least 2 hours before serving.

Courtesy of: Kayln's Kitchen


Like what your reading? Share it!

Saturday, November 24, 2012

Vegetable Gratin a la Goat Cheese


This recipe is a hybrid of 2 recipes I found online and decided to tweak a little bit. I must say the results did turn out quite tasty, especially if you like the unique tangy flavor of goat cheese. I omitted the potatoes from the original recipe because we were already having 2 carb heavy dishes in our Thanksgiving meal - feel free to add them back in if you want.

Ingredients:
  • 1 large sweet yellow onion, diced
  • 2 cloves of garlic, minced
  • 1-2 zucchini, 1/4 inch sliced
  • 2-4 yellow squash, 1/4 inch sliced
  • 3-4 large Roma tomatoes, 1/4 inch sliced
  • 3 tablespoons olive oil
  • 4 ounces goat cheese
  • 1/4 cup milk
  • 1/2 cup grated Parmesan cheese
  • Sea salt, freshly cracked black pepper, to taste
Directions:
  1. Preheat the oven to 375 degrees. Coat a baking dish with olive oil cooking spray. 
  2. Heat 1 tbsp of olive oil in a large skillet over medium heat. Once hot, add the onions and saute until translucent, about 8 minutes. Add the garlic and cook for another 60 seconds. Spread the onion mixture on the bottom of the greased baking dish.
  3. Layer ½ of the goat cheese on top of the onions.
  4. Slice the zucchini, squash and tomatoes in 1/4 inch thick slices. Layer them alternately in the dish on top of the onions, fitting them tightly into a spiral, making only one layer. 
  5. Season with sea salt, black pepper and dried thyme, to taste. 
  6. Drizzle the last tablespoon of olive oil over the top.
  7. Pour the milk over the entire dish.
  8. Cover the dish with tin foil and bake for 35 minutes, or until the vegetables are tender. Uncover and sprinkle the Parmesan cheese on top and bake for another 25-30 minutes or until browned. Enjoy.
Inspired from :


Like what your reading? Share it!

Thursday, November 22, 2012

Cocktail Meatballs or Little Smokies


This is a super easy appetizer to put out at a party that is delicious! I added the lemon juice to help cut the excessive sweetness of the grape jelly - its your call.

Ingredients:
  • 1 bag frozen original meatballs or 2 packages of little smokies cocktail sausages (watch for MSG) or homemade meatballs if you are feeling adventurous!
  • 2 bottles chili sauce
  • 2 cups grape jelly
  • 1 tbsp lemon juice
Directions:
  1. Bake meatballs as directed on package (normally 15-20 minutes at 350 degrees).
  2. While those are baking, combine chili sauce, grape jelly & lemon juice in a pot. Bring to a simmer, stirring occasionally. 
  3. Add meatballs and continue to simmer for the next hour. 
  4. Serve with toothpicks!

  • Option: combine all into crockpot and let simmer on high for an hour. (FYI - I tried this on low overnight and it burned the sausages beyond recognition; hence why the pic is of round 2 -> meatballs)


Like what your reading? Share it!

Thursday, October 25, 2012

Super Easy Banana Pudding


I love finding old recipes I had forgotten about! I came across this recipe I found back in college that I used to fix for potluck dinners for my fraternity (For those of you who are wondering: yes, it is a fraternity, and yes I'm a girl, and yes it is a co-ed professional fraternity). Any-who, I only had to collect my dish at the end of the night and not worry about leftovers (well, it would have been nice if there were a little left over). This was super easy and delicious! I hope you enjoy!

Ingredients:

  • 8 ounces sour cream
  • 1 (8 oz) container frozen whipped topping, thawed
  • 1 (5 oz) package instant vanilla pudding mix
  • 2 cups whole milk
  • 1 (16 oz) package vanilla wafer cookies
  • 4 bananas, peeled and sliced
Directions:
  1. In a large bowl, combine sour cream, whipped topping, pudding mix and milk. Mix well.
  2. In the bottom of a glass serving dish, place a layer of cookies, then a layer of pudding mixture, then a layer of bananas. 
  3. Repeat until all ingredients are used.
  4. Refrigerate before serving.
Courtesy of: Uncooked Banana Pudding at Allrecipes


Like what your reading? Share it!

Wednesday, October 24, 2012

Launching PharmCreations - an Etsy Shop


In addition to cooking, I have always had a passion for crafting and photography. The photography part I indulge in on a regular basis. Crafting inspiration (and now Pinterestspiration :) - I'm sure most of you can relate) I have gone through in spurts in the past, largely due to time constraints from work and school. 

The main reason I developed this blog was to have an online paperless resource for recipes I want to keep in my own "recipe book". Now that I have 60 published posts, I'm starting to miss have a good ole recipe book in the kitchen. I don't like printing recipes that I am fixing for the 3rd+ time; that's a waste of paper. Dragging a laptop or dealing with my phone is doable but can be frustrating as how my hands will be in raw meat and the phone turns off - grrr!!! Wash hands, turn back on/hit page down, get hands dirty again, repeat in a few minutes. 

So that got me thinking: I want a recipe book that I can add to easily and something that won't get disgusting if food gets dripped on it. Ideas start running through my head... My perfect recipe book needs to be bind-able and printable. That eliminates the old fashioned recipe box - I've always disliked those for some reason. 3 ring binders come to mind. Great idea - I can add to that, page protectors will keep the pages clean. Now to make it cute. Looking around Pinterest, I found fabric covered binders. Hmm... interesting. Why don't I check out Etsy and see what's out there for these fabric covered binders?? Cruise on over to Etsy... start checking it out... there are some great looking fabric binders that these sellers offer! Adorable!! BUT what happens if my beloved fabric covered binder is on the counter and something spills or I don't see that little puddle of water on the counter? Gross!! There's really no good way to disinfect/clean the fabric if it gets either stained or splattered with raw meat or something else that could grow bacteria. Ewww! Those thoughts turn my stomach. Ok, so what about vinyl? I can put disinfectant on that without a problem and it should wipe clean since it's waterproof. Great! Search on Etsy again...nothing really comes up. Have I come across the undiscovered country of Waterproof binders?? Surely, I'm not the only one who thinks this way about recipe books. Hmmm, the crafter in me starts thinking again. This could be dangerous. I could make this myself. 

So off to Joann's I go, to see what has surfaced in the fabric world since I have last bought fabric (Which has probably been about 5-10 years since my sewing machine has surfaced. College kept me busy most of the 2000's). Wow! I forgot how much I love that store! It was even better than I remember and the crafter in me started coming out even more. I collected a couple of sample materials to work with and returned home. In my pinterest adventures, I saw posts on how wonderful this Mod Podge stuff is for gluing/decoupage-ing/waterproofing. I had never used it in the past, but it claims to be the best thing since the invention of the wheel and Swiss cheese so I thought I would give it a whirl on some fabric. I wish I had saved the swatch of fabric I Mod Podged and submitted it to one of those Pinterest Fail sights. It was not pretty. Yeah, it may have sealed the fabric to some degree, but it was the roughest, stiffest fabric I have ever felt. It could have doubled as sandpaper. I was disappointed that the wonderful patterns of cotton fabric had not become an option for this project.Very sad. 


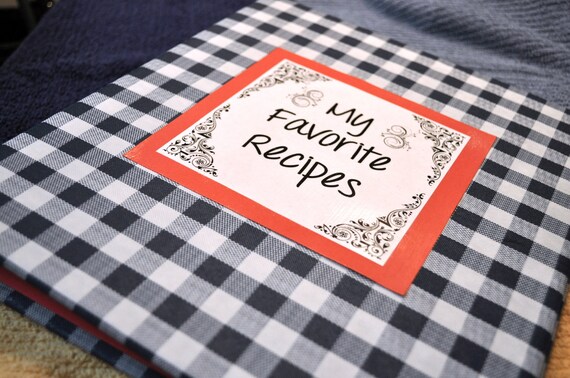
Onto the next experiment. I had also bought a remnant of vinyl tablecloth type material. This may work better. I grabbed some spray adhesive and went to work on adhering it to my binder. This is going great. It's smooth, waterproof, cute and cooperating! I then cut and adhered coordinating scrapbook paper to the inner cover. This looks wonderful! Now onto cover design. I got to learn more about Adobe Photoshop Elements in designing the graphic art for the front cover. Oh, the custom options are limitless! I adhered my design to the same color scrapbook paper as for a border. Hmm, how to make this waterproof. I didn't really want to get into the laminating business, that would require an even bigger investment and another trip into town. Let's try the Mod Podge again. It worked so much better on paper than fabric! Two coats dried later, I sealed it with some clear acrylic for good measure. I then adhered it to my binder. Voilà!  I was quite impressed with myself. That wasn't too bad either. Back to my original thought, the undiscovered country of waterproof binders. I could sell these. And so, PharmCreations was born! 

Take a look at my final product!

Water Resistant Fabric Covered 1 Inch 3 Ring Recipe Binder


Like what your reading? Share it!