Showing posts with label For the Home. Show all posts

Wednesday, January 2, 2013

Homemade Glass Cleaner


Happy New Year everyone! I decided to try another homemade cleaning product - glass cleaner this time - to see if it is all it is cracked up to be. My skeptical self was pleasantly surprised at how well this works - just like the brand! It cut through dried food spilled on the stove top like pre-made glass cleaner does. It also cleaned the bathroom mirror without streaking! I thought I would share this wonderful find. As always, be careful mixing chemicals. Be in a well ventilated areas and don't go breathing in the noxious fumes!

I would caution to only use this on "approved glass cleaner" surfaces such as glass, chrome, stainless steel, plastic, enamel, ceramic tile, and/or porcelain. Do NOT use on wood or other varnished surfaces. Always spot test if there is a question (and use your common sense lol). Enjoy!

Ingredients:
  • 1/8 cup ammonia
  • 1/2 cup rubbing alcohol (70% isopropyl alcohol)
  • 1/4 tsp dish soap of choice
  • ~1 qt water
  • 1 qt spray bottle
Directions:
  1. Pour ammonia, rubbing alcohol and dish soap into spray bottle.
  2. Add enough water to fill bottle.
  3. Place sprayer securely on bottle and mix gently.
  4. Clean away!
Courtesy of Budget Savy Diva


Like what your reading? Share it!

Wednesday, October 24, 2012

Launching PharmCreations - an Etsy Shop


In addition to cooking, I have always had a passion for crafting and photography. The photography part I indulge in on a regular basis. Crafting inspiration (and now Pinterestspiration :) - I'm sure most of you can relate) I have gone through in spurts in the past, largely due to time constraints from work and school. 

The main reason I developed this blog was to have an online paperless resource for recipes I want to keep in my own "recipe book". Now that I have 60 published posts, I'm starting to miss have a good ole recipe book in the kitchen. I don't like printing recipes that I am fixing for the 3rd+ time; that's a waste of paper. Dragging a laptop or dealing with my phone is doable but can be frustrating as how my hands will be in raw meat and the phone turns off - grrr!!! Wash hands, turn back on/hit page down, get hands dirty again, repeat in a few minutes. 

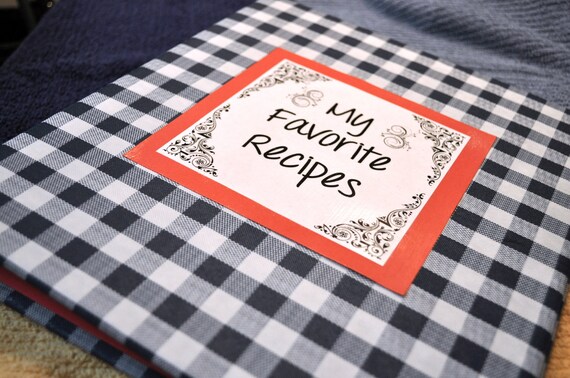
So that got me thinking: I want a recipe book that I can add to easily and something that won't get disgusting if food gets dripped on it. Ideas start running through my head... My perfect recipe book needs to be bind-able and printable. That eliminates the old fashioned recipe box - I've always disliked those for some reason. 3 ring binders come to mind. Great idea - I can add to that, page protectors will keep the pages clean. Now to make it cute. Looking around Pinterest, I found fabric covered binders. Hmm... interesting. Why don't I check out Etsy and see what's out there for these fabric covered binders?? Cruise on over to Etsy... start checking it out... there are some great looking fabric binders that these sellers offer! Adorable!! BUT what happens if my beloved fabric covered binder is on the counter and something spills or I don't see that little puddle of water on the counter? Gross!! There's really no good way to disinfect/clean the fabric if it gets either stained or splattered with raw meat or something else that could grow bacteria. Ewww! Those thoughts turn my stomach. Ok, so what about vinyl? I can put disinfectant on that without a problem and it should wipe clean since it's waterproof. Great! Search on Etsy again...nothing really comes up. Have I come across the undiscovered country of Waterproof binders?? Surely, I'm not the only one who thinks this way about recipe books. Hmmm, the crafter in me starts thinking again. This could be dangerous. I could make this myself. 

So off to Joann's I go, to see what has surfaced in the fabric world since I have last bought fabric (Which has probably been about 5-10 years since my sewing machine has surfaced. College kept me busy most of the 2000's). Wow! I forgot how much I love that store! It was even better than I remember and the crafter in me started coming out even more. I collected a couple of sample materials to work with and returned home. In my pinterest adventures, I saw posts on how wonderful this Mod Podge stuff is for gluing/decoupage-ing/waterproofing. I had never used it in the past, but it claims to be the best thing since the invention of the wheel and Swiss cheese so I thought I would give it a whirl on some fabric. I wish I had saved the swatch of fabric I Mod Podged and submitted it to one of those Pinterest Fail sights. It was not pretty. Yeah, it may have sealed the fabric to some degree, but it was the roughest, stiffest fabric I have ever felt. It could have doubled as sandpaper. I was disappointed that the wonderful patterns of cotton fabric had not become an option for this project.Very sad. 


Onto the next experiment. I had also bought a remnant of vinyl tablecloth type material. This may work better. I grabbed some spray adhesive and went to work on adhering it to my binder. This is going great. It's smooth, waterproof, cute and cooperating! I then cut and adhered coordinating scrapbook paper to the inner cover. This looks wonderful! Now onto cover design. I got to learn more about Adobe Photoshop Elements in designing the graphic art for the front cover. Oh, the custom options are limitless! I adhered my design to the same color scrapbook paper as for a border. Hmm, how to make this waterproof. I didn't really want to get into the laminating business, that would require an even bigger investment and another trip into town. Let's try the Mod Podge again. It worked so much better on paper than fabric! Two coats dried later, I sealed it with some clear acrylic for good measure. I then adhered it to my binder. Voilà!  I was quite impressed with myself. That wasn't too bad either. Back to my original thought, the undiscovered country of waterproof binders. I could sell these. And so, PharmCreations was born! 

Take a look at my final product!

Water Resistant Fabric Covered 1 Inch 3 Ring Recipe Binder


Like what your reading? Share it!

Friday, March 9, 2012

Homemade Concentrated Liquid Laundry Detergent


I bet you're wondering what liquid laundry soap is doing on a food blog. Well, homemade liquid laundry soap had peaked my interest a few weeks ago, but I haven't had both the time or the courage to try it. Until now. I figured that since it follows a recipe, is cooked on the stove, and I used an electric mixer, I could sneak it in here on my blog.

In browsing different recipes for homemade liquid detergent, I came to a few conclusions: 1) Fels-Naptha soap, Borax, and Arm & Hammer Washing Soda are the most common ingredients. 2) This is one of the most ridiculously simple and economical substitutes you can make at home. 3) You can change the concentration if you have limited space/storage containers and decent math skills.

I used the Duggar's recipe and White Silk Purse's concentrated recipe as my reference. I liked the reviews both recipes got but I did not have the room for the Duggar's version. I decided instead of the original 10 gallon yield the Duggar recipe delivered, I aimed for a 1 gallon yield. The Duggar recipe originally said that for top loader washing machines to use 5/8 cup per load. In converting down to the 1 gallon yield, this would equate to only needing 1 tbsp per load and the entire recipe yields 256 loads of laundry! For Front Load Machines, the Duggar recipe called for 1/4 cup per load. The concentrated version comes out to needing only 1.2 tsp or 6 mL per load. I would suggest either using a syringe or marking an existing scoop with a permanent marker to show the correct amount. The entire recipe would yield about 630 loads!

All of the ingredients are found on the laundry aisle of the grocery store. I want to point out that you want to use Washing Soda and not Baking Soda - NOT THE SAME! There is the option of using your essential oil of choice to scent your soap. I wouldn't worry about using separate kitchen appliances for this project because everything you use should be dishwasher safe and you use soap to clean your dishes, right?

My Adventures

I chose to start with 6 cups of hot water to dissolve the ingredients. I wanted to find out how much the ingredients displaced into the volume of water. I measured the dissolved mixture and it yielded right at 7 cups. So I only needed to add 1 more cup of hot water at that point to have my soap in easily divisible quantities to go into my storage containers. Since I did not have an abundance of same size storage containers readily available, I chose two 6 cup plastic containers, a 3 cup mason jar and a 1 cup mason jar to total the 16 cups the recipe will eventually yield (that would equal a gallon). I placed 3 cups of concentrate into the 6 cup containers, 1 & 1/2 cups into the 3 cup container, and 1/2 cup into the 1 cup container. I then added those amounts again of water into the respective containers to total out to their full capacity. (Not complicated at all, right? But a girl's gotta do, what a girl's gotta do to get it done.)

After letting it sit overnight, it separates into 2 layers - the top being much more solid and the bottom being a gel-like consistency. Take a knife to break up the solid layer. Use either a blender or electric hand mixer to cream the layers back together. While it doesn't seem to separate out again, I give mine a quick shake before I use it to make sure it's still well mixed (that's the neurotic pharmacist in me). I tried my first load start to finish today and my towels came out wonderfully! They really did not have a scent to them - just clean!

Yields:
  • 1 gallon of concentrate 
  • Per Load Use: 
    • Top Loaders - 1 tbsp 
    • Front Loaders - 6 mL or 1.2 tsp
Ingredients
Grated Fels-Naptha
  • 1 bar Fels-Naptha soap, grated
  • 1 cup Arm & Hammer Super WASHING Soda (not baking)
  • 1 cup Borax
  • 6 cups water for boiling 
  • 1 cup very hot water to add to concentrate after dissolving
  • 8 cups very hot water to top off the containers
  • 4 1-quart wide-mouth storage containers (such as mason jars or old Tupperware-like plastic sealable containers)
  • Optional essential oil of choice for favorite scent
Directions
  1. Place 6 cups water in a 2 1/2-3 cup saucepan. Turn on medium heat.
  2. Grate the Fels-Naptha either using a hand-grater or food processor. If you hand-grate, you should have enough time to get the Fels-Naptha into the water before the water starts to boil. You really don't want it to come to a full boil because I read that will not be pretty and you will have a lot of soap to clean up on the stove.
  3. Slowly stir in the grated Fels-Naptha into the hot water. Keep stirring. It will take about 10-15 minutes for it to dissolve into the water.
  4. Remove from heat.
  5. Stir in Washing Soda. Keep stirring. Stir in Borax. Keep stirring until all is completely dissolved.
  6. Add one more cup of very hot water to the mixture.
  7. Place equal amounts (2 cups), carefully, in each container. Add 2 more cups of very hot water to each container, where each will have a total of 4 cups per container. 
  8. Place lids on each and let sit for at least 8 hours or overnight. It will separate into 2 layers as it cools.
  9. Take a knife and slice into the top layer like you would a pie to break it up the solids.
  10. Depending on your containers, use either an electric mixer or blender to cream the layers together. Start slow, then increase the speed as the solids get smaller. If you have any "chunks" left, they should be no bigger than the size of a BB, if not smaller. 
  11. Use either 1 tbsp of soap for top-loaders or 6 mL (or 1.2 tsp) for front-loaders.


Like what your reading? Share it!